Weathervanes in the Wind
Author(s): Deb Spatafore
Subject: Earth Science
Grade Level(s): Grade 5
Big Idea(s): 1, Making weathervanes is a strong folk art tradition. In early days, weathervanes were necessary and practical. Today they are made for decoration.
2. In making their own weathervanes students will be challenged to create a unified sculpture.
3. Both wind and water cycles affect the weather. Students will learn how to predict wind direction.
What you need: * Pencils
* Modeling clay
* Paper cups
* Black sharpie markers
* 5″ pieces of cloth tape (3M Vetape)
* Straws
* Colored markers
* Cardstock
* Scissors
* Rulers
* Straight pins
* Beads
Setting: in and outside the classroom
Time Needed: 1-2 days
Summary:
Students will study and create their own weathervane.
Learning Goals / Objectives:
1, Making weathervanes is a strong folk art tradition. In early days, weathervanes were necessary and practical. Today they are made for decoration.
2. In making their own weathervanes students will be challenged to create a unified sculpture.
3. Both wind and water cycles affect the weather. Students will learn how to predict wind direction.
Background
Weathervanes were used extensively in the United States, from the Colonial Era through the 19th century. Most farmers relied on weathervanes and the Farmer’s Almanac to predict the local weather, and help them with planting and harvesting decisions. Weather vanes are usually placed high on buildings because the wind blows more steadily out of the way of buildings and trees. Down near the ground the wind can become turbulent and blow every which way. So if the wind is blowing unsteadily, the weather vane will twist and shift as the wind moves. The rooster was the most popular weathervane ornament, and was brought over from Europe where it was believed to be a good luck sign. Making weathervanes was a popular folk art tradition. Folk art is art that is made, sometimes for practical purposes, by artists that were not trained in fine arts.
Setup:
Gather all the materials needed.
Anticipatory Set:
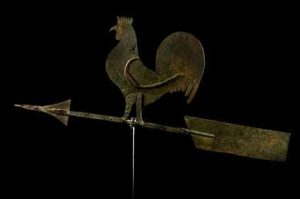
Artwork: Rooster Weathervane, (19th century), Unknown Artist
Discussion Questions:
• Do you know what this object is? What?
• Can you guess why it would be important to know wind direction? If a farmer knew that a northwest wind commonly brought rain to the area, how would that help him? How would wind direction help a fire fighter?
• Do you know how we use weathervanes today? (Mostly as decoration.)
• Explain the term “folk art.” Do any of you know someone who makes beautiful quilts or furniture, and learned the craft without going to art school? They would be considered folk artists. Do you know any other kind of folk artist?
EXPLAIN WHAT UNITY MEANS IN Art
Explain unity in art, using the “What is Unity in Art” Handout (see attached). Next, discuss the weathervane below by asking How is this modern weathervane unified?
Instructions / Activities:
Explain to students that they are going to make a weather vane, and their challenge is that they must make a weathervane that is unified through repetition of color and shape, and style. The weathervane will already by unified through proximity, because all the parts will be connected, however, the pencil, used as part of the project, will be a colorful design. The design and color of the pencil will be a clue to ways to unify this weathervane.
Step 1: Create the weathervane base
Provide students with 1 bar of modeling clay, a paper cup, a sharpened decorative pencil, Black Sharpie Marker, and a 5″ piece of the cloth tape (3M Vetape). Give the following directions and demonstrate if necessary.
a. Break the modeling clay into pieces, and mold it into the cup.
b. Turn the cup over and cover the cup with the cloth tape. (The tape sticks to itself)
c. On the top of the cup use a Sharpie Pen to mark the 4 cardinal directions N, S, E, and W, in the appropriate locations.
d. Find the center of the cup and push the pencil point into that place.
Step 2: Create the directional portion of the weathervane
1. Provide each student with a straw, and a piece of white cardstock. Colored markers should be available to each student or groups of students.
2. Explain that students will be making an arrow and a tail for their weathervanes.
• Direct student to draw an arrow shape on the cardstock, about 2 inches long, using a pencil.
• Direct students to draw an arrow tail shape on the cardstock, also about 2 inches long.
• Have students use markers to great a unified design on the shapes, explaining that the colors and shapes within the pencil should be a clue to how the weathervane might be unified. Remind students that the shapes will be cut out, so the design can go beyond the edges.
• Using scissors, cut out each shape. Turn the shapes over and make the same design on the other side.
Step 3: Putting it all together
Provide students with a straw, a ruler, straight pin, and 2 beads. Demonstrate putting the weathervane together, as follows:
• Cut a slit (in the same direction … top to bottom, or side to side) on each end of the straw. The slit should be about 1/2 inch long.
• Slide the arrow and the arrow tale into the straw.
• Slide one bead onto the pin.
• Using the ruler, find the center of the straw (with the arrow and the tail lying flat on the desk) and poke the pin through the center portion from top to bottom.
• Slide a second bead through the bottom of the pin.
• Push the pin into the top of the pencil. Blow on the weathervane to make sure it moves freely.
Assessment:
Teacher’s discretion.
Wrap-up / Closure:
Put the weathervanes in a central location and discuss how each is unified. How did this artist create unity in their artwork
Take the weathervanes outside (hopefully, in an unencumbered space) and see how they are affected by the wind. Discuss. SEE REFERENCE MATERIAL ABOUT HOW WIND IS CREATED. Use the Beaufort Scale to describe the wind. Which seems more accurate?

Tags: Grade 5
Categories: Earth Science