Zap!!! Lightning in a Bottle
Subject: Physics
Grade Level(s): Grade 4
Topic: Static Charge
Big Idea(s):
- Students know how to design and build simple series and parallel circuits by using components such as wires
- Students know electrical energy can be converted to light
- Measure and estimate the weight, length, or volume of objects.
- Follow a set of written instructions for a scientific investigation.
- Students know charged particles are sources of electric fields and are subject to the forces of the electric fields from other charges.
What you need:
- Empty film canister
- Bare copper wire (-1.5 mm diameter -15 gauge)
- Foil
- Short screw or bolt with two nuts
- Scotch Tape
- Charging equipment
Grouping: Work in Groups of 2
Vocabulary Words:
Time Needed:
Summary:
In this activity we will build a Leyden Jar using a film canister, foil and a wire. Essentially our Leyden Jar is a macroscopic “capacitor” that can store a relatively big static charge. When grounded the excess charge will produce a small blue spark (like a mini-lightning strike).
Learning Goals / Objectives:
1.) Students will be introduced to the concept of capacitance, discharge and grounding.
2.) Students will be able to link capacitance and grounding to natural phenomena like lightning.
Background
This activity, like all electrostatic activities that rely on building up and maintaining a charge, can be a bit temperamental. It will work best on a dry day with very low humidity. If the activity is not working as you expect, you may want to try a variety of charging devices. You should also make sure the circuit is not closed during charging.
Safety
This activity has little to no risk associated with it. If the Leyden Jar grounds to a student they may receive a small shock. It may be startling, but it is not dangerous.
Anticipatory Set:
Driving Questions
1.) What does grounding do?
2.) Why do I get shocked when I rub my feet on the carpet?
Instructions / Activities:
Part A: Build your Zap Bottle
Make sure you have access to the following:
- Empty film canister
- Bare copper wire (~1.5 mm diameter ~ 15 gauge)
- Foil
- Short bolt with two nuts
- Scotch Tape
- Sharp Pencil
1.) The cap to your film canister needs to have a small hole in its center. If it does not already have one, use a pencil to poke a small hole near the middle.
2.) Thread one nut up to the top of the bolt.
3.) Thread your bolt through the small hole in the top of the film canister, with the bolt head (and nut) on the top of the canister cap
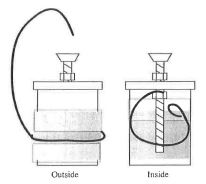
4.) Thread a second nut below the cap. The bolt should fit snuggly in the canister top, with the two nuts holding it in place.
5.) Cut two aluminum foil rectangles. They need to be about 6 inches long and 1 1/2 inch wide (or 3 inches wide to double over).
6.) Wrap one rectangle around the outside of the bottom portion of the film canister and tape it in place. Be sure to leave a region of foil exposed, not covered in tape. The rectangle should cover the bottom ~2/3 of the canister.
7.) Wrap the second rectangle around the inside of the bottom portion of the film canister and tape it in place. Be sure to leave a region of foil exposed, not covered in tape.
8.) Secure a ~6 inch piece of bare copper wire to the bolt below the canister lid using one of the nuts. Bend the wire into a loop larger than the lid. This will help insure that the copper wire will be in contact with the aluminum foil on the inside of the film canister when the lid is in place.
9.) Use an ~8 inch piece of bare copper wire to make a loop with a long “tail”. The loop should fit snuggly around the region of exposed foil on the outside of the film canister. Be careful not to tear through the foil. The tail must be long enough to easily touch the middle of the bolt in the top of the film canister (when the top is in place).
10.) Fix the bare copper wire loop in place with tape.
11.) Place the lid on the top off the canister. Make sure the copper wire on the inside is in good contact with the aluminum foil on the inside of the canister.
12.) Optional: cover the outside of the canister and copper loop with tape. This will hold parts in place and help keep you from marring the outer foil.
Part B: Charge!
1.) Move the copper wire tail away from the bolt head.
2.) Charge a rod.
3.) Transfer the charge from the rod to the bolt head.
4.) Repeat steps 2 and 3 a few times (more if you dare!).
5.) Bring the copper wire tail close to the bolt head.
6.) Record your observations.
Follow up questions:
1. Write a brief explanation for what happens when you bring the long copper tail close to the charged nut. Words to the wise: capacitance, charge, grounding, conducting, discharge.
2. Draw a sketch of what the charge distribution on foil inside of the canister looks like before charging, a.ft er one charge, and after several charges .
3. From your observations, how many charges could your canister take before the “Zap!” might be dangerous? Justify your answer.
Assessment:
Teacher’s Discretion
Wrap-up / Closure:
Practical Application Extension questions:
1.) How does the concept of capacitance apply to a defibrillator or the flash in a camera?
2.) Draw a picture to explain how lightning works.
Too Cool:
Check out: http://phet.colorado.edu/en/simulation/travoltage
These materials are contained in a kit in our Library!
